|
For your convenience, the material on this page is available in a downloadable PDF file. Projection Competition Requirements In order for all competitors to have an equal advantage and considering the software the club has selected to use for displaying and scoring images during the competition, it is necessary to require all images be scaled to 1050 pixels along the longest edge
NOTE: The number of pixels along the longest edge was changed after this tutorial was written; therefore, examples may show a different number than this. All images must be saved using sRGB Color Space All images must be saved in a JPEG formatted file with a .jpg extension Prior to the September 2009 competition, members were required to also set the number of pixels per inch to 96. This is no longer necessary. How to Scale and Save Images on Your Hard Drive Similar methods are used by all software programs, but the exact method depends upon which software you use. Examples of Corel's PaintShop Pro, Adobe's Elements, IrfanView and Adobe's Photoshop CS3are shown on this page. In general, the first step is to process the image in the same size as was downloaded from your camera onto your hard drive. A key point to remember is the quality of an image that is increased in size is never as good as the image before sizing. This is because the software has to interpolate or guess the color values between the original pixels. Therefore, it is recommended that you do processing with as many pixels as came from the camera. It is acceptable to crop an original camera image before further processing as long as the number of pixels along the longest edge is not less than 768 for the CdCC competitions2. It is your decision how to process the images prior to resizing. Do whatever you believe gives the best appearing image for the specific competition. Most cameras default to sRGB color space automatically, so their images need no color space conversion. However, if you have adjusted your camera for Adobe RGB or some other color space, you will need to convert them to sRGB in order to get the most accurate colors for the projector. Similarly, if you shoot raw images, and you have rendered them as Adobe RGB jpegs, convert those to sRGB. After processing, you will need to set the image size, color space and JPEG quality and then save the results as a separate file. Normally, you should choose the "Save As" option from a menu choice. The naming convention is your choice. Do not do a plain "Save" if doing so overwrites the original image. If you do that, the original image will be lost forever without the possibility of reprocessing the original or resizing for another purpose such as printing. Here is an example Original saved in My Pictures\04-19-2010\Mad Dog.jpg Processed and resized saved in My Pictures\04-19-2010\CdCC Pet Competition\Mad Dog.jpg Notice that this individual created a sub-folder named CdCC Pet Competition where the processed images were saved. 2 Other non-CdCC competitions may require more or less pixels. Corel PaintShop Pro PaintShop Pro Resizing To resize an image, from the menu select Image/Resize and the dialog as shown in Figure 1 appears.
Note: It is permissible to perform additional processing, including sharpening, on the resized images if you believe the results yield a better image. The decision is up to you. PaintShop Pro Color Space To set the color space, choose the menu option File/Color Working Space. The dialog in Figure 2 appears.
Select the SRGB Color Space Profile and check the Use embedded profiles radio button. PaintShop Pro Compression Setting Saving a file in JPEG format in PaintShop Pro requires the user to select menu option File/Export/JPEG Optimizer as shown in Figure 3.
Selecting this option brings up the optimizer dialog shown below. The JPEG optimizer is where you set the JPEG quality. PaintShop Pro sets the compression ratio, which is a method for reducing file sizes. The problem is that more compression and smaller file sizes result in reduced image quality because some of the image information is lost during the compression process.
PaintShop Pro uses compression values while other programs define quality settings. It is believed that a PaintShop Pro compression setting of 10 is approximately equivalent to a quality setting of 90% in other programs; however, without further study, this premise is unproven. The results of saving the same file with different JPEG compressions are shown in Table 1. It shows that increasing the compression decreases the file size. What it does not show is the image degradation. It is nearly impossible for a human to tell the difference between images saved at a 10 instead of 1. However, setting the compression value to 20 and above is noticeable. Table 1, File Size Comparison Example
It is recommended to set the compression to a value of 10. The image perceived by a human is not affected (and hence the judge's score), and the amount of disk storage for CdCC is reduced. Adobe Elements Images and much of the content in this section were provided by CdCC member Hans Kernast Adobe Elements Resizing To resize an image, from the menu select Image/Resize Image and the dialog as shown in Figure 5 appears.
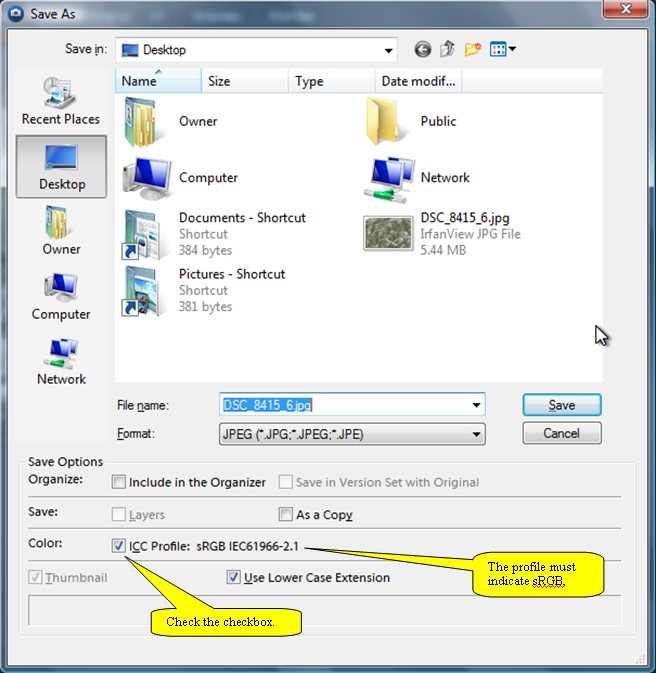
Note: It is permissible to perform additional processing, including sharpening, on the resized images if you believe the results yield a better image. The decision is up to you. Adobe Elements Color Space You must set the color space in Adobe Elements during the file saving operation. First, select the File/Save As option from the menu and the dialog shown in Figure 6 appears.
Check the checkbox in the Color section. The profile must indicate sRGB. If it does not, then cancel the file save operation and follow the instructions below for converting to sRGB color profile. After the conversion, return to this dialog to confirm the settings. If it is necessary to convert the color profile, click on menu item Image/Convert Color Profile/Apply sRGB Profile as shown in Figure 7.
After performing the conversion, return to File/Save As dialog as shown in Figure 6 and perform the steps previously described. Adobe Elements Quality Setting Adobe Elements uses a quality setting to specify the amount of compression and the quality of the image. Adobe sets the quality during the saving process. The user first selects the menu File/Save As option. Next, the user must enter a file name and choose the JPEG format option. When the user clicks Save, the dialog shown in Figure 8 appears.
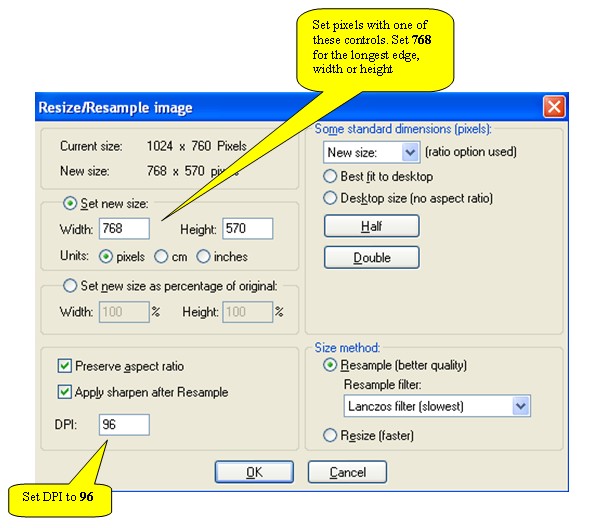
Elements uses a quality scale of 1 to 12 with 12 being the highest quality, least amount of compression and largest file size. When the quality is set to 10, it is virtually impossible to tell the difference from a file saved with a 12. Setting to 10 will be imperceptible and therefore not affect the judge's score, but it will save disk storage space for CdCC. Alternately, the user can select Quality Maximum and Baseline Optimized combinations. IrfanView Software IrfanView Resizing To resize an image, from the menu select Image/Resize-Resample and the dialog as shown in Figure 9 appears.
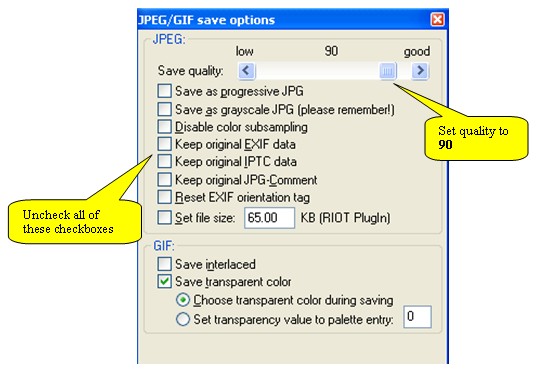
Note: IrfanView uses the term DPI (dots per inch) instead of pixels per inch. DPI means the same thing. Note: It is permissible to perform additional processing, including sharpening, on the resized images if you believe the results yield a better image. The decision is up to you. IrfanView Color Space IrfanView does not have a color space control. It always assumes sRGB. IrfanView Quality Setting IrfanView allows you to set the quality of the JPEG image when the file is saved. Chose File/Save As and two dialogs appear on screen. One is the standard Windows save dialog where the user selects the folder and file name. The second dialog is shown in Figure 10 and is where the quality is set. Remember to set the quality before actually saving the file.
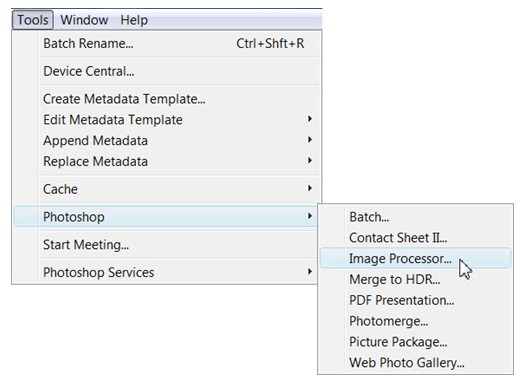
IrfanView scales quality as 0 to 100 with 100 being the highest quality. When the quality is set to 90, it is virtually impossible to tell the difference from a file saved with a 100. The difference in the image's appearance will be imperceptible and therefore not affect the judge's score, but it will save disk storage space for CdCC. Adobe Photoshop CS3 In brief, after processing your images, you must use the Image Processor to set the file type, color space and size. Next, set the resolution using the Image Size window, do a final sharpening and save the file. Details for performing these procedures follow. CdCC member, Jerry Gerber, offers email assistance to other club members experiencing difficulties using the following procedures. Contact him at jerrygerber@cranburydigitalcameraclub.org. Setting Photoshop File Type, Image Size and Color Space To set the file type, image size and color space, run the Image Processor. Select menu item Tools/Image Processor as shown in Figure 11.
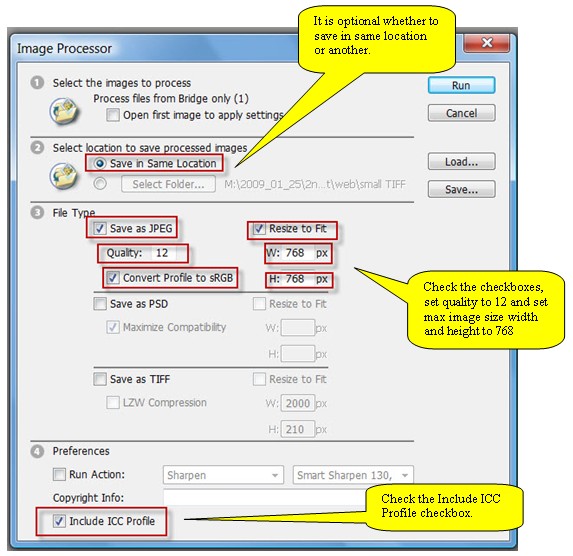
That action opens the Image Processor window shown in Figure 12.
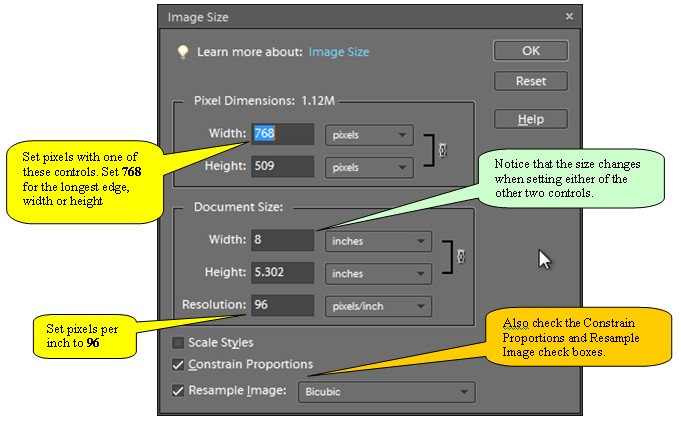
In Section 2 of this dialog, you have the option of saving your image in the same folder as the original image or another folder on your hard drive. If you choose Save in Same Location as shown in Figure 12, the Image Processor creates a subfolder named JPEG for your processed images; this is where you will find the final image to upload for the competition. Note: Since the new files go into a separate folder, they will not overwrite your original files. Later, you may rename them for consistency with your file-naming conventions. In Section 3 of the dialog, check the checkbox to Save as JPEG file and the other two associated checkboxes to Resize to Fit and Convert Profile to sRGB. Set the Quality value to 12 and the maximum height and width to 768. Note: In a later dialog, the quality is set to a lower level to reduce the file size for transmission over the Internet. For now, the quality level is set to 12 to prevent degradation of the image when saved multiple times. Check the Include ICC Profile checkbox in Section 4 of the dialog. Lastly, click the Run button in the dialog's top right corner. Setting Photoshop Image Resolution Using menu item File/Open, browse for the JPEG file saved when the Image Processor was run, and open it. After the image opens, use menu option Image/Image Size and the dialog shown in Figure 13 opens.
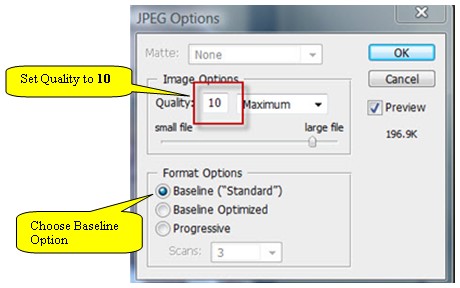
Set Resolution to 96 pixels per inch. After doing this, Adobe computes the size of a printed image for information if the user were to print the image. For CdCC projection competitions, the print size is irrelevant, but the 96 pixels per inch is significant. When the parameters are set as shown, click the OK button. Sharpen Image Suggestion The reduced image may benefit from additional sharpening after running the Image Processor and setting the image resolution. Use the Adobe tool that is most comfortable for you. One possibility is the Smart Sharpen filter with Amount 125 and Radius .3 settings for images of this size. Set Adobe Photoshop Quality and Perform Final Save Select File/Save As from the menu and the JPEG Options dialog shown in Figure 14 appears.
Set Quality setting to 10. When the quality is set to 10, it is virtually impossible to tell the difference from a file saved with a 12. The difference in the image's appearance will be imperceptible and therefore not affect the judge's score, but it will save disk storage space for CdCC. |